3 minutes
Golang: File upload and download (Part 3)
Golang: Upload/Download GUI
In the first two part we have written a golang program that can upload and downalod file.
In this third and final part we want to create a simple GUI that allows the user to interact with the previously developed services via browser. The goal is to create a graphical interface that allows the user to view the files on the server in addition to uploading and downloding.
Golang Template
For this small project we want to minimize external dependencies, for this reason we have chosen to use the html / template package offered by the standard Go library Package template (html/template) implements data-driven templates for generating HTML output safe against code injection.
First lets go ahead and create a main function that executes a really simple template so we can see it in action.
package main

import (
  "html/template"
  "os"
)

func main() {
  t, err := template.New("tmpl").Parse("<h1>Hello, {{.Name}}!</h1>")
  if err != nil {
    panic(err)
  }

  data := struct {
    Name string
  }{"World"}

  err = t.Execute(os.Stdout, data)
  if err != nil {
    panic(err)
  }
}
If you run the code with the command go run main.go. You will see the output:
<h1>Hello, World!</h1>
List file
As we saw in the previous example with golang template, use the data calculated in the go code to make our graphic interface dynamic. In our case we want to list the files already uploaded to the server and show them on the html page.
We have to define our template which will contain the list of our files, we want the user to have the option to download a file by clicking on the name. To obtain the desired result, we will create a simple table with three columns: file name, file size and modification date. The tag defines a hyperlink, which is used to link the column to the download service. The href attribute indicates the destination of the link, in our case “/ download? Filename = …”.
<div class="panel col-12">
    <div class="panel-header">
        <div class="panel-title">
            <h1>Go Files Server</h1>
            <p>A simple golang files server</p>
        </div>
    </div>
    <div class="panel-body">
        <div>
            <table class="table table-striped table-hover">
                <thead>
                    <tr>
                        <th>Name</th>
                        <th>Size</th>
                        <th>Date</th>
                    </tr>
                </thead>
                <tbody>
                    {{range .Files}}
                    <tr class="active">
                        <td><a href="./download?filename={{.Name}}"><b>{{.Name }}</b> </a></td>
                        <td>{{.Size}}</td>
                        <td>{{.ModTime}}</td>
                    </tr>
                    {{end}}
                </tbody>
            </table>

            </ul>
        </div>
    </div>
</div>
We can list the files in a folder through the following code:
func ListFile() []os.FileInfo {
	f, err := os.Open("./data/")
	if err != nil {
		log.Print(err)
    }
    // read the whole directory
	files, err := f.Readdir(-1)
	f.Close()
	if err != nil {
		log.Print(err)
	}
	onlyfiles := make([]os.FileInfo, 0)
    // ignore folders
	for _, file := range files {
		if !file.IsDir() {
			onlyfiles = append(onlyfiles, file)
		}
	}
	return onlyfiles
}
Once the list of files has been recovered, we can run our template with the data
err := templates.Execute(w, map[string]interface{}{"Files": ListFile()})
Upload Form
Now that we have found a way to list and download the files, we must allows the user to upload new files. To do this we should expand our template, adding a form that will submit the file to our upload service.
<form class="form-horizontal" method="post" action="/upload" enctype="multipart/form-data">
    <div class="input-group">
        <input type="file" name="myfiles" id="myfiles" multiple="multiple"
            class="form-input input-lg">
        <input type="submit" name="submit" value="Upload"
            class="btn btn-primary input-group-btn btn-lg"
            style="height: 2.3rem !important;">
    </div>
</form>
To make our page graphically better we will use as css framework Spectre.css.
Spectre.css is a lightweight, responsive and modern CSS framework.
- Lightweight (~10KB gzipped)
- Flexbox-based, responsive and mobile-friendly layout
- Elegantly designed and developed elements and components
To utilize spectre.css we can use the unpkg to load compiled Spectre.css in our page.
<head>
	<meta name="viewport" content="width=device-width, initial-scale=1.0">
	<link rel="stylesheet" href="https://unpkg.com/spectre.css/dist/spectre.min.css">
	<link rel="stylesheet" href="https://unpkg.com/spectre.css/dist/spectre-exp.min.css">
	<link rel="stylesheet" href="https://unpkg.com/spectre.css/dist/spectre-icons.min.css">
	<title>File Server</title>
</head>
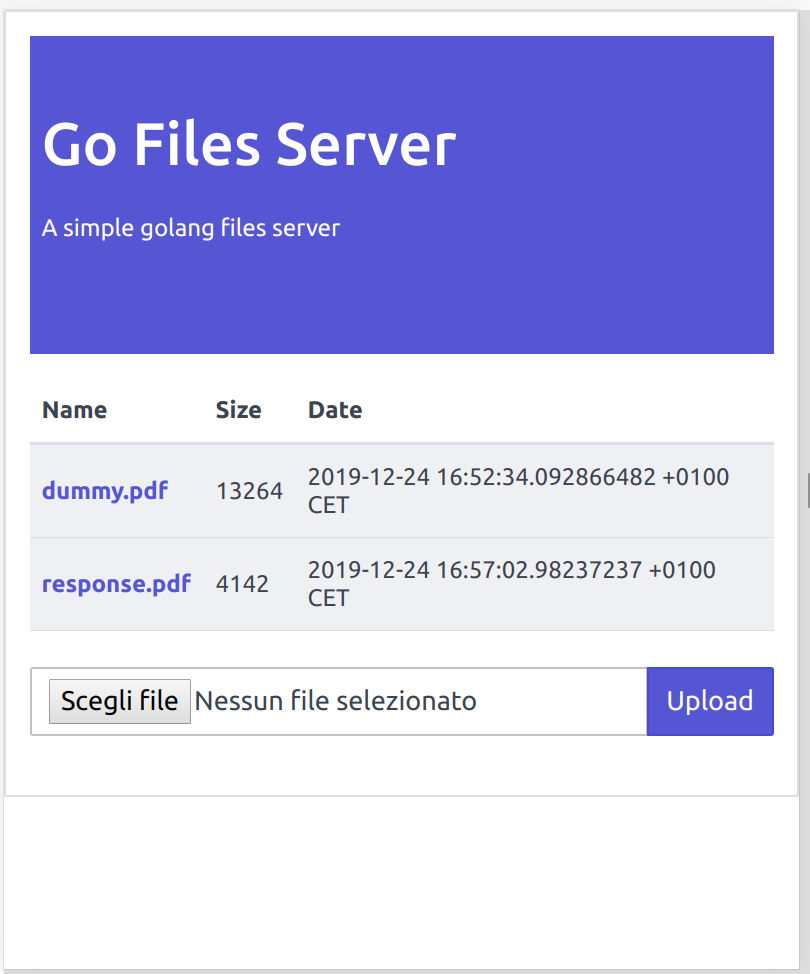
In the figure below we can see the final result of our page:

To download the complete example GitHub.